
Google Ads is Google’s online advertising platform that allows businesses to display ads on:
Google Search results
YouTube
Gmail
Websites within the Google Display Network
Every time someone clicks your ad, you pay a small fee — this is known as PPC (Pay-Per-Click).
1- To get instant leads and inquiries
2- To increase visibility on Google Search
3- To promote products or services
4- To generate traffic, app downloads, sales, and many more.
With the right strategy, Google Ads can deliver high ROI and targeted customers.
Before you begin, make sure you have:
1- A Google (Gmail) account
2- Business website URL (optional — you can still run ads without a website)
3- Basic business information
4- Payment method (credit/debit card or net banking depending on country)
Once you have these ready, you can set up your Google Ads account smoothly.
Step 1: To create a Google Ads account, first open your browser and visit the official Google Ads website
Step 2: Once the homepage open, you will see the Google Ads interface. On the top-right corner of the page, click on the Sign in button.
If you have previously created a Google Ads account with your Gmail, the system will show all your existing account. Below Accounts, there's a button for "New Google Ads Account." Clicking on it opens the new Ads account creation steps.
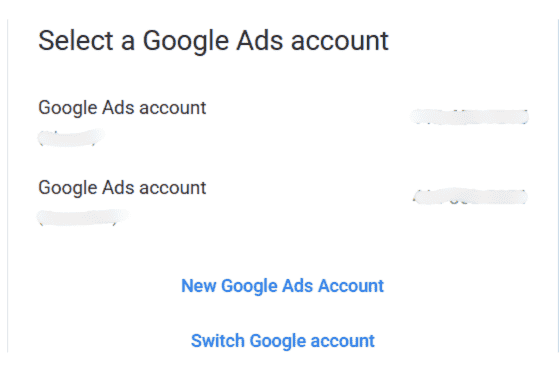
If you have not created a Google Ads account earlier, you will be redirected to the account creation setup page where you can start creating a new Google Ads account.
Step 3: Click on “New Google Ads Account”. Google will prompt you to start creating your first campaign.
Step 4: Once you click on the “Create New Google Ads Account” button, Google automatically directs you to the “Create your first campaign” screen.
This is where the setup of your very first advertisement begins.
What's your business name? You can enter your business name here or leave it blank as this field is optional.
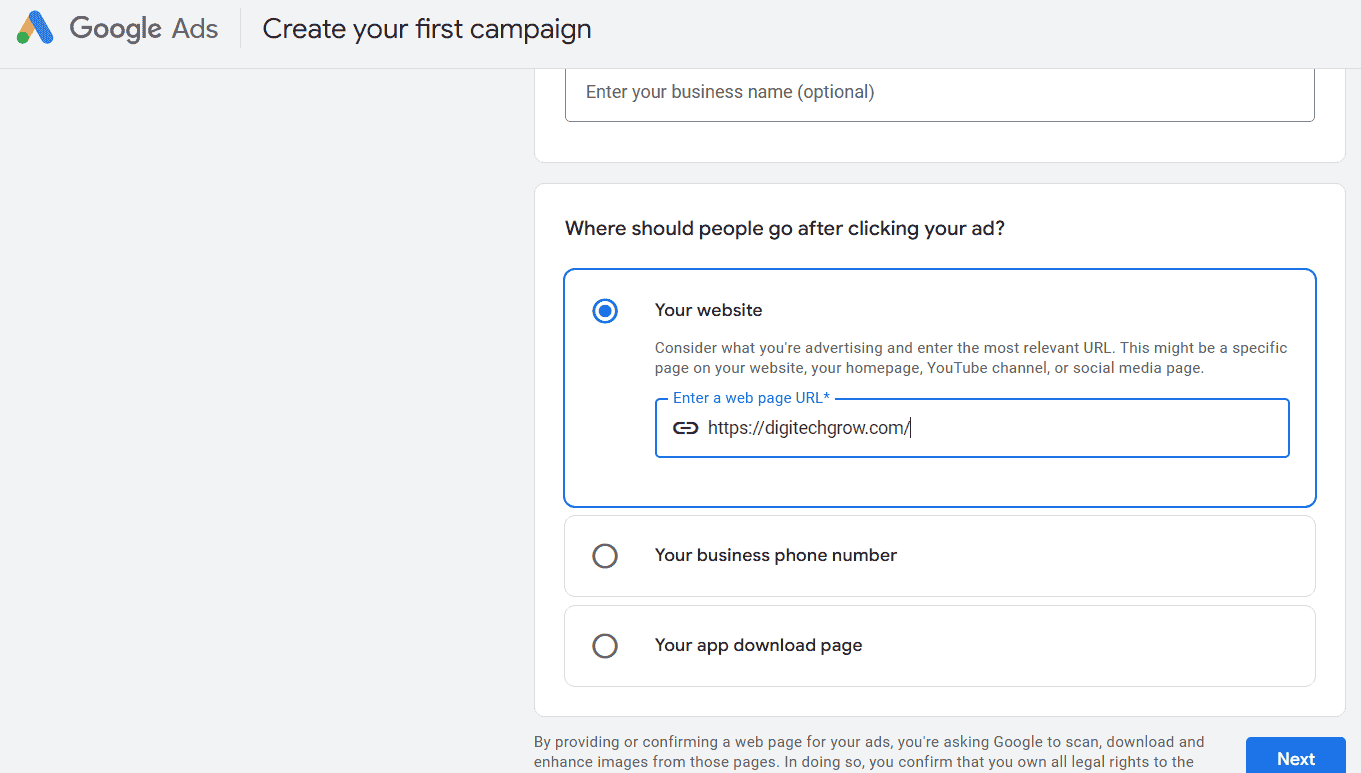
Where should people go after clicking your ad? This means Google wants to know which page users should be redirected to when they click your advertisement.
You will see three options:
1 - Your website - If you want visitors to land on your website or landing page
2 - Your business phone number - If your goal is to drive direct calls from customers
3 - Your app download page - If your goal is to get more app downloads
In this, we are selecting website. Enter your webpage URL. After entering your URL correctly, click on the Next button at the bottom-right corner.
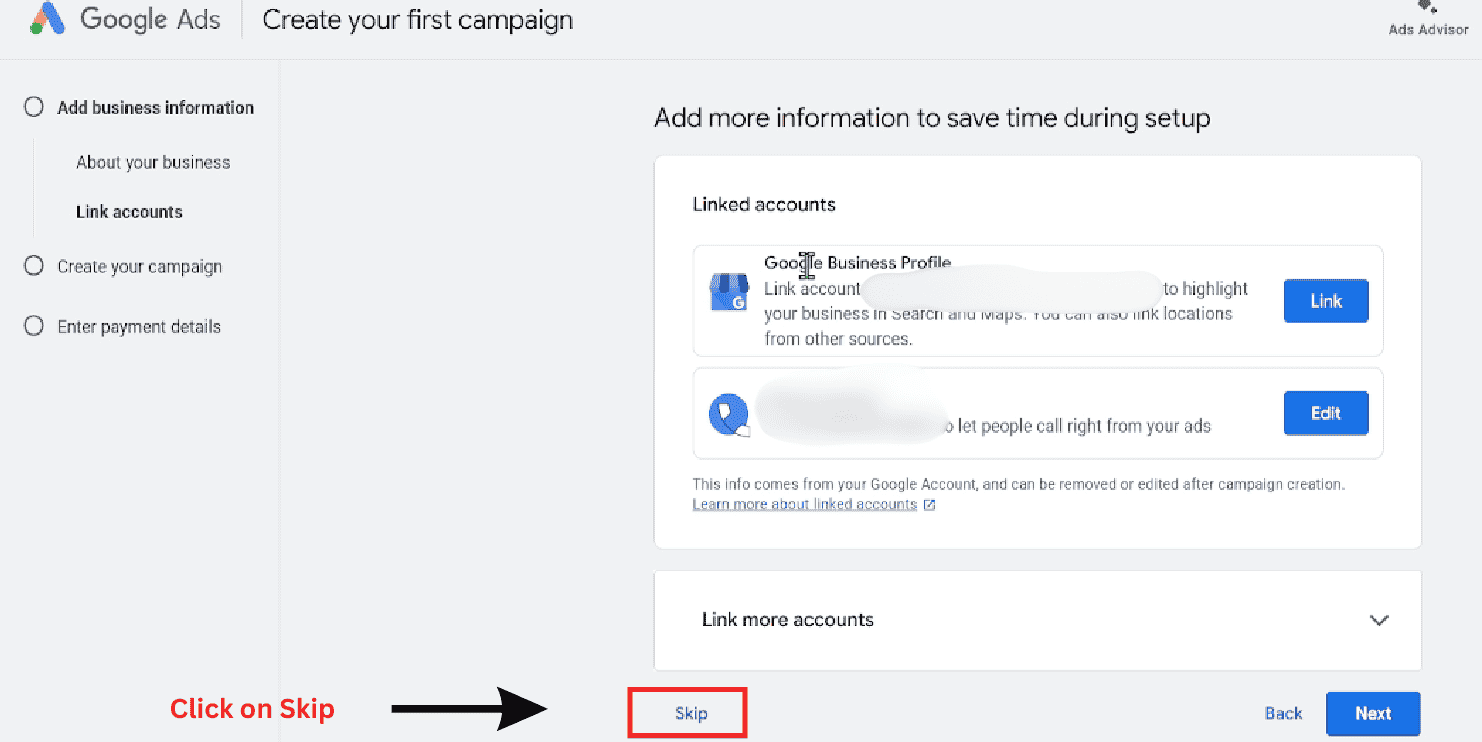
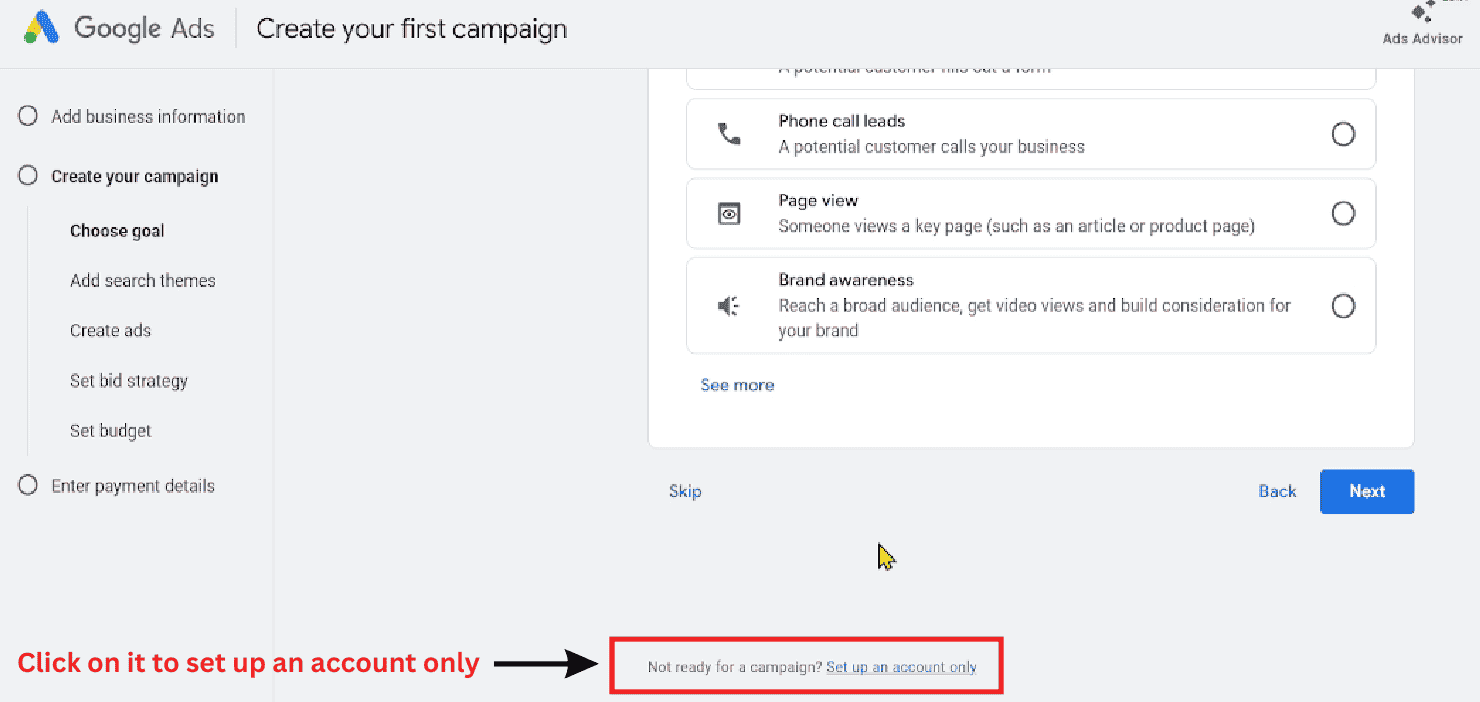
Step 5: After clicking on Next, you will see the setting for Link Accounts, which you should skip for now; you can link the accounts later. After skipping, you will see the setting of add goals. In which Google will give you options to select goals, but instead of selecting it, scroll down a little and you will see Not ready for campaign setup account only, click on it.
Step 6: Now, Google Ads will ask you to set up your account preferences. These details help Google determine how billing, reporting, and payments will work for your ad account.
You will see three fields on this page:
Billing Country, Time Zone, Currency enter these details carefully in Google Ads because it cannot be changed in future. To change these details, you will have to create new Google Ads account
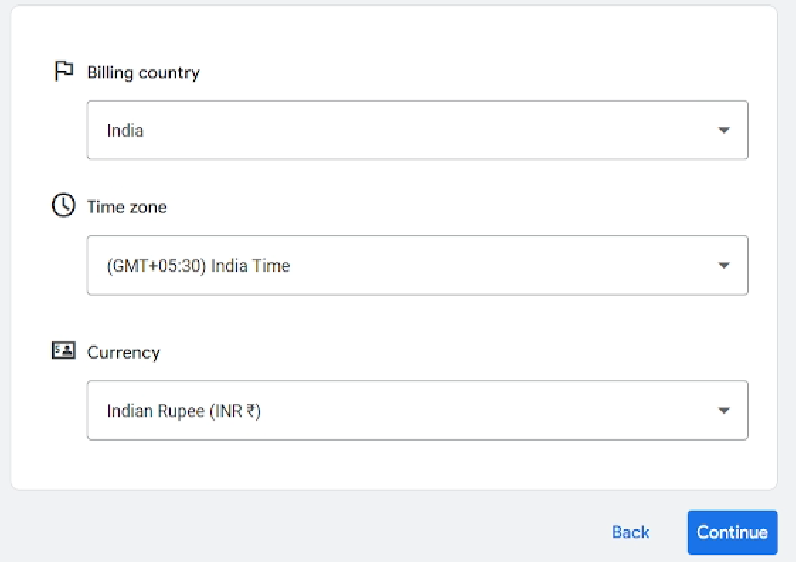
Choose the country where you will be managing and paying for your Google Ads campaigns. Since this is for India, India is selected.
Billing Country is important in Google ads because Billing features, payment methods, and tax rules depend on the country you select.
Next, select your time zone. (GMT +05:30) India Time.
The time zone is important in Google ads because it decides when your ads start and stop running, how reports are generated, and how daily budgets are calculated. Once set, the time zone cannot be changed later, so choose carefully.
In the Currency section, select the currency you want to use for payments and billing.
Once all three fields (Billing Country, Time Zone, Currency) are selected, click the Continue button at the bottom-right corner
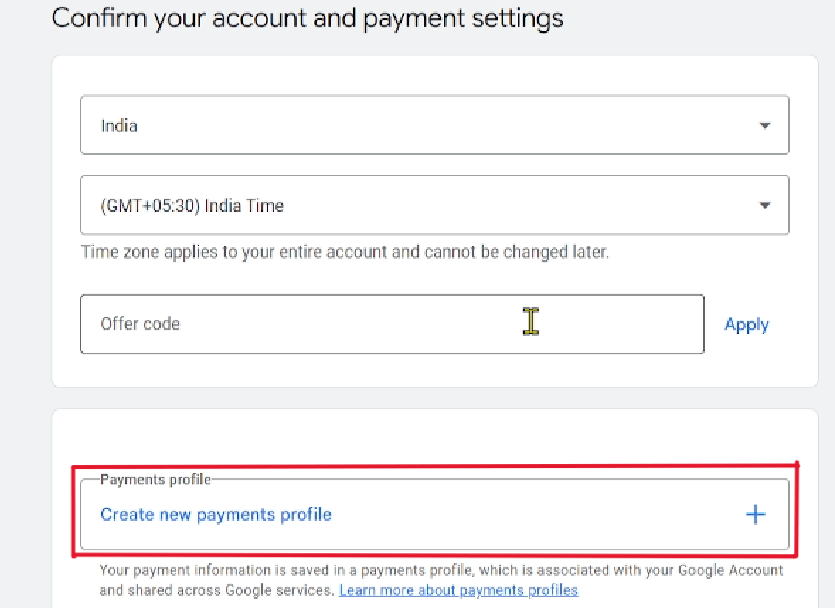
After selecting your billing country, time zone, and currency, Google Ads will take you to the Payments Profile setup page. This step is compulsory because Google needs your business and billing details to generate invoices and process payments for ads. To continue, click on Create New Payments Profile. Once you click, a form will appear as shown in the image.
You will need to fill in the following information:
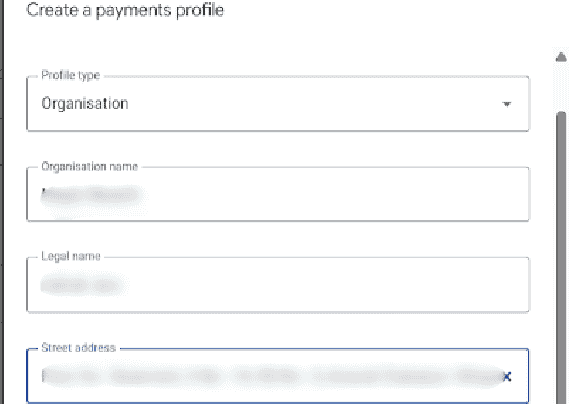
Profile Type - Choose whether you are creating the account as an Individual or an Organisation. If your ads are for a company or brand, always select Organisation.
Organisation Name - Enter your company or business name.
Street Address - Enter your complete business address exactly as mentioned in your official business records.
After that enter your Town / City name, PIN code, State.
Payment Profile is important in Google Ads because it stores Billing address, Tax and GST details, Payment mode (UPI / credit card / net banking / wallet) and many more.
After completing the Payments Profile, Google Ads will show the “Add Payment Method” screen. This is where you need to choose how you would like to pay for your advertising.
Google Ads provides multiple payment options such as:
Add credit or debit card
Pay with Net Banking
Pay with Bank Transfer
You can select any method depending on your convenience. In this, we selected Add credit or debit card. Once selected, enter the required card details:
Card number Expiry date CVV
Cardholder name
After filling in the information, click on Save Card to continue.
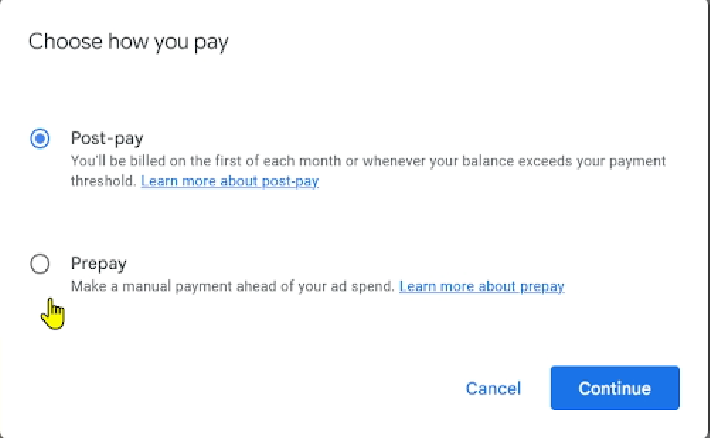
Choose How You Pay — Postpay vs. Prepay
Next, Google will ask you to select your payment preference, and you will see two options:
Postpay - You pay after your ads run. Google charges you once you hit the billing threshold or the end of the month — whichever comes first.
Prepay - You pay before your ads run. Your balance gets deducted each time your ads spend money. Ads stop when the prepaid balance becomes zero.
For this setup, we selected Postpay because it offers flexibility — ads continue to run and payment is collected automatically afterward. After selecting Postpay, click Continue.
Verify Payment to Complete Setup
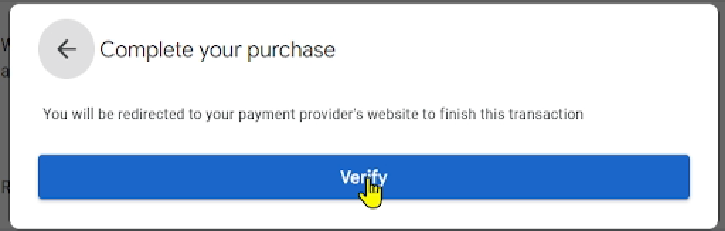
Once you click Submit, Google takes you to the “Complete your purchase” page. You will see a message similar to: You will be redirected to your payment provider’s website to finish this transaction. Below that, click the Verify button.
You will now be redirected to your bank’s secure website for verification. Your bank will send a One-Time Password (OTP) to your registered mobile number. Enter the OTP to confirm and verify the payment method.
Once the verification is completed, Google will confirm your payment method and your Google Ads account will be successfully created.
Once your account setup is complete, you can:
1- Verify your Google Ads account
2- Set up conversion tracking (like calls, form submissions, purchases)
3- Create your campaign using a clear strategy
Many beginners face account issues because of these mistakes:
1- Selecting the wrong time zone or currency
2- Entering incorrect business name or billing details
3- Violating Google Ads policy (leads to account suspension)
Tip: Always review all settings before confirming.
Everything you need to know about Google Tag Manager, from basics to advanced implementation
No. You can create a Google Ads account without a website. However, to run most campaign types, such as Search or Performance Max, a landing page or website is recommended. You can still run ads to a phone-call extension or app without a website.
Yes. Creating a Google Ads account is completely free. You only pay when your ads start running and receive clicks or impressions, depending on the campaign type.
Google automatically redirects users to Smart Mode and encourages campaign setup. To avoid this and get full access, switch to Expert Mode and select “Create an account without a campaign.”
Creating an account does not automatically run ads. You must create a campaign, add keywords, ads, and billing details, then enable the campaign manually.
No. Time zone and currency cannot be changed once the account setup is completed. Select them carefully during billing configuration.
Payment methods vary by country, but most commonly include: Credit/debit card Net banking / UPI Automatic or manual payments You can check available payment methods under Billing → Payment Methods.

Grow your business with best performance marketing strategy
© 2024 DigiTechGrow. Developed by DigiTechGrow.